8 Surprising Ways to Minimize Allergies - Dr. Weil's Weekend Tip
I came across this great article and thought I would share it. I would also like to add that I have nettles available for sale as tincture, tonic, or loose herbs so you can make your own tonic or tincture. Contact me if you're in the Chicago area or you want me to ship some your way!!
Saturday, June 14, 2014
Friday, May 2, 2014
Epsom Salts - Don't underestimate the power of the epsom!!
Epsom Salt Uses & Benefits
What is Epsom salt?
 Epsom salt, named for a bitter saline spring at Epsom in
Surrey, England, is not actually salt but a naturally occurring pure
mineral compound of magnesium and sulfate. Long known as a natural
remedy for a number of ailments, Epsom salt has numerous health benefits
as well as many beauty, household and gardening-related uses.
Epsom salt, named for a bitter saline spring at Epsom in
Surrey, England, is not actually salt but a naturally occurring pure
mineral compound of magnesium and sulfate. Long known as a natural
remedy for a number of ailments, Epsom salt has numerous health benefits
as well as many beauty, household and gardening-related uses.Studies have shown that magnesium and sulfate are both readily absorbed through the skin, making Epsom salt baths an easy and ideal way to enjoy the amazing health benefits (*1). Magnesium plays a number of roles in the body including regulating the activity of over 325 enzymes, reducing inflammation, helping muscle and nerve function and helping to prevent artery hardening. Sulfates help improve the absorption of nutrients, flush toxins and help ease migraine headaches.
What are the health benefits of using Epsom salt?
The wonders of Epsom salt have been well known for hundreds of years and unlike other salts, Epsom salt has beneficial properties that can soothe the body, mind and soul. Some of the countless health benefits include relaxing the nervous system, curing skin problems, soothing back pain and aching limbs, easing muscle strain, healing cuts, treating cold and congestion, and drawing toxins from the body. One of the simplest ways to ease stress and stress-related problems is to soak in a tub full of hot water with a few cups of Epsom salt. Some of the magical benefits of Epsom salt include:Eases stress and relaxes the body
Stress drains the body of magnesium and increases levels of adrenaline. When dissolved in warm water, Epsom salt is absorbed through the skin and replenishes the level of magnesium in the body. The magnesium helps to produce serotonin, a mood-elevating chemical within the brain that creates a feeling of calm and relaxation. Research shows that magnesium also increases energy and stamina by encouraging the production of ATP (adenosine triphosphate), the energy packets made in the cells. Experts believe that bathing with Epsom salt at least three times a week helps you to look better, feel better and gain more energy. Magnesium ions also relax and reduce irritability by lowering the effects of adrenaline. They create a relaxed feeling, improve sleep and concentration, and help muscles and nerves to function properly.Relieves pain and muscle cramps
An Epsom salt bath is known to ease pain and relieve inflammation, making it beneficial in the treatment of sore muscles, bronchial asthma and migraine headaches. In addition, it has been known to heal cuts and reduce soreness from childbirth. Mix a thick paste of Epsom salt with hot water and apply to get soothing comfort. Try soaking your aching, tired (and smelly) feet in a tub of water with half a cup of Epsom salt which softens skin and will even neutralize foot odor.Helps muscles and nerves function properly
Studies show that Epsom salt can help regulate electrolytes in your body, ensuring proper functioning of the muscles, nerves and enzymes. Magnesium is also known to be critical in the proper use of calcium, which serves as a main conductor of the electric impulses in your body.Helps prevent hardening of arteries and blood clots
Epsom salt is believed to improve heart health and help prevent heart disease and strokes by improving blood circulation, protecting the elasticity of arteries, preventing blood clots and reducing the risk of sudden heart attack deaths.Makes insulin more effective
Proper magnesium and sulfate levels increase the effectiveness of insulin in the body, helping to lower the risk or severity of diabetes.Relieves constipation
Numerous studies have revealed that Epsom salt can be used to treat constipation. Taken internally, Epson salt acts as a detoxifying agent for colon cleansing. The salt acts like a laxative by increasing water in the intestines and can bring about temporary relief from constipation. However, it is strictly warned that Epsom salts should not be used to relieve constipation without the consultation of a physician.Eliminates toxins from the body
The sulfates in Epsom salt help flush toxins and heavy metals from the cells, easing muscle pain and helping the body to eliminate harmful substances. Your skin is a highly porous membrane and adding the right minerals to your bathwater triggers a process called reverse osmosis, which actually pulls salt out of your body, and harmful toxins along with it. For a detoxifying bath, at least once weekly add two cups of our Epsom salt to the water in a bathtub and soak for 10 minutes.What are some uses of Epsom salt?
Whether you like a relaxing soak or wish to enhance your beauty effortlessly, making Epsom salt a part of your daily routine can add a whole lot of goodness to your way of life. To experience the numerous health benefits of Epsom salt, take relaxing, stress-relieving Epsom salt baths three times weekly by adding 2 cups of Epsom salt to a warm bath and soaking for at least 12 minutes. For the added benefit of moisturizing your skin, add 1/2 cup olive oil. Do not use soap as it will interfere with the action of the salts. Try to rest for about two hours afterwards. If you have arthritic joints move them as much as possible after an Epsom salt bath to prevent congestion in the joints.As a foot bath, pamper weary feet by adding 1/2 cup of Epsom salt to a basin of warm water. Relax and soak feet for 20 minutes. If you like, rub away any calluses using a pumice stone. Dry feet, then add two drops of peppermint essential oil to your favorite natural moisturizer, like shea or coconut butter, and rub in thoroughly to lock in the moisture. If you are pregnant or have any health concerns, check with your doctor before using Epsom salts.
Epsom salt uses: HEALTH
Athlete’s Foot - Soak feet in an Epsom salt bath to help relieve the symptoms of Athlete’s Foot.Remove splinters - Soak affected skin area in an Epsom salt bath to draw out the splinter.
Treat toenail fungus - Soak your affected toes in hot water mixed with a handful of Epsom salt three times a day.
Soothe sprains and bruises - Add 2 cups Epsom salt to a warm bath and soak to reduce the pain and swelling of sprains and bruises.
Ease discomfort of Gout - Ease the discomfort of gout and reduce inflammation by adding 2-3 teaspoons of Epsom salts into a basin and immersing the affected foot/joint. The water should be as hot as it is comfortable. Soak for about 30 minutes.
Epsom salt uses: BEAUTY
Exfoliate dead skin - In the shower or bath, mix a handful of Epsom salt with a tablespoon of bath or olive oil and rub all over your wet skin to exfoliate and soften. Rinse thoroughly.Exfoliating face cleanser - To clean your face and exfoliate skin at the same time, mix a half-teaspoon of Epsom salt with your regular cleansing cream. Gently massage into skin and rinse with cold water.
Dislodge blackheads - Add a teaspoon of Epsom salt and 3 drops iodine into a half cup of boiling water. Apply this mixture to the blackheads with a cotton ball.
Remove foot odor - Mix a half cup of Epsom salt in warm water and soak your feet for 10 minutes to remove bad odor, sooth achy feet, and soften rough skin.
Remove hairspray - Combine 1 gallon of water, 1 cup of lemon juice, and 1 cup Epsom salt. Cover the mixture and let set for 24 hours. The next day, pour the mixture into your dry hair and leave on for 20 minutes before shampooing as normal.
Hair volumizer - Combine equal parts deep conditioner and Epsom salt and warm the mixture in a pan. Work the warm mixture through your hair and leave on for 20 minutes. Rinse thoroughly.
Epsom salt uses: HOUSEHOLD
Clean bathroom tiles - Mix equal parts Epsom salt and liquid dish detergent and use as a scrub on bathroom tile.Prevent slugs - Sprinkle Epsom salt on or near interior entry points to prevent slugs.
As a hand wash - Mix Epsom salt with baby oil and keep by the sink for an effective hand wash.
Epsom salt uses: GARDENING
Fertilize your houseplants - Most plants need nutrients like magnesium and sulfur to stay in good health and Epsom salt makes the primary nutrients in most plant foods (nitrogen, phosphorus, potassium) more effective. Sprinkle Epsom salt once weekly to help nourish your houseplants, flowers and vegetables.Keep your lawn green - Magnesium sulfate crystals, when added to the soil, provide vital nutrients that help prevent yellowing leaves and the loss of green color (magnesium is an essential element in the chlorophyll molecule) in plants. Add 2 tablespoons of Epsom salt to a gallon of water and sprinkle on your lawn to keep the grass healthy and green.
Insecticide spray - Use Epson salts on your lawn and in your garden to safely and naturally get rid of plant pests.
(1.) "Report on Absorption of magnesium sulfate (Epsom salts) across the skin", Dr RH Waring, School of Biosciences, University of Birmingham. B15 2TT, U.K.
For additional benefits Simple Life. Simple Health adds baking soda and essential oil to create lovely bath salt blends and scrubs that go together perfectly. Contact us and place your order today.
Sunday, February 16, 2014
Simple Life. Simple Health. Products
I am posting some of the pictures of the products that Simple Life. Simple Health. is offering because the website is under construction and the pictures on my Facebook page get lost in the mix of messages, comments and all that good stuff. I am creating an Etsy account but my schedule is a bit insane right now so I want to at least be able to have people come here and view succinct pictures of my products.


Face Spritzers
Ingredients: Distilled water, glycerin (100% vegetable), essential oil (sometimes a carrier oil is added if someone wants extra moisturizing benefits)
The Face Spritzer is great for re-hydrating your face after being in the sun or simply from dealing with the elements. It is also excellent for tonifying your face and setting it once you have applied your makeup. The ingredients can be customized for your preferences. Common scents used are Orange, Peppermint, Lavender, and Peace and Calming.

Bathsalts
Ingredients: Epsom salt, Sea salt, Baking Soda, Essential Oils
These are great for taking a relaxing soak in the bathtub. The Epsom salts help your muscles to relax and assist in releasing lactic acid which is what causes muscle soreness. The sea salt helps to cleanse and detoxify your body. The baking soda is also a great cleanser. The essential oils provide different benefits depending upon which is used. The Orange is cheering, Lavender is balancing, Peace and Calming does as the name suggests, and the Peppermint is invigorating. Once again, these salts can be customized so if there is a scent you really like or a blend you are looking for then just ask me.

Body Scrubs
Ingredients: Sea salts or Sugar, Essential oils, Carrier oils
The essential oils and carrier oils vary. Additionally a more exfoliating blend can be made by adding coarser salts and ground pumice upon request. As always these can be customized for your preferences.
These body scrubs can be used specifically for the feet. I usually use a more viscous oil such as olive and grapeseed blends for this. I also tend to make these blends a bit coarser upon request. These are great exfoliates, detoxifiers, cleansers, and moisturizers. As always everything is 100% natural and vegan friendly.

Peace and Calming Oil Blend
Ingredients:
Lavender, Orange, Ylang Ylang, Neroli, and Blue Tansy
Lavender, Orange, Ylang Ylang, Neroli, and Blue Tansy

Gift bags available!
We are now offering gift bags for all occasions. Additionally we create customized gift options and party favors especially for weddings and showers.


Saturday, November 9, 2013
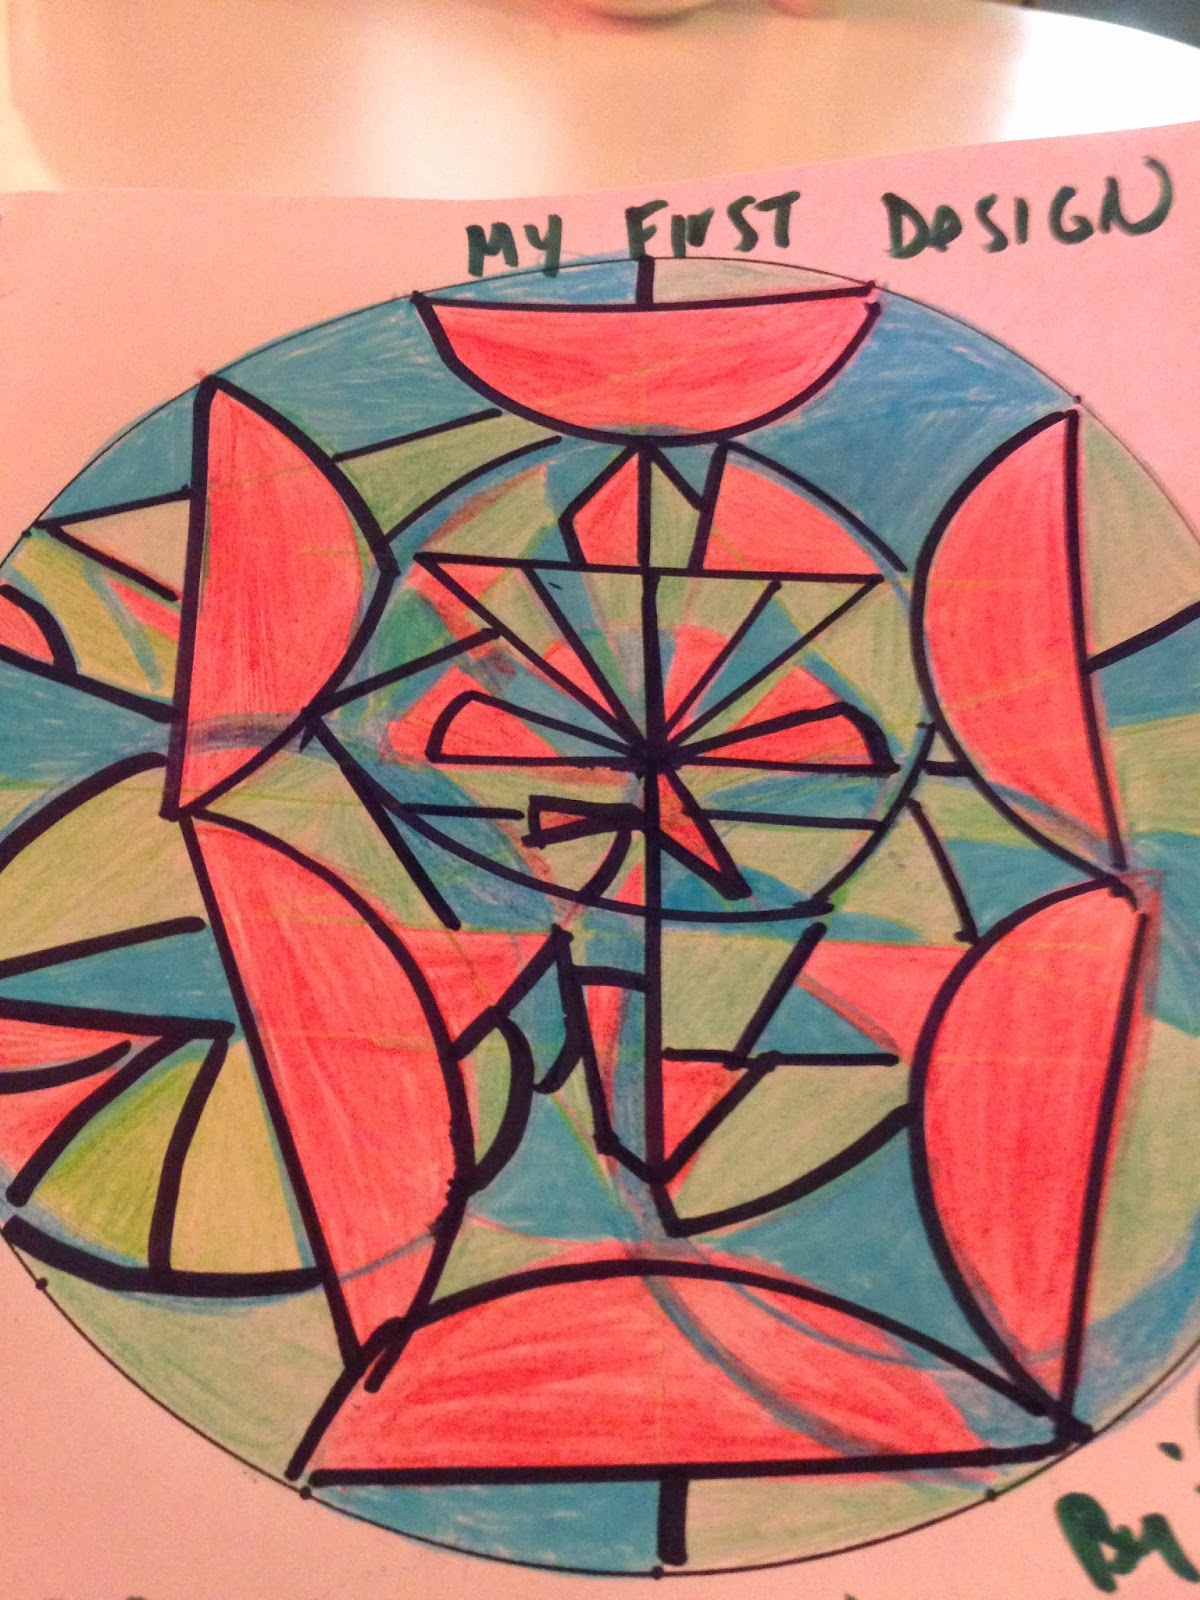
Mandalas - featured guest blogger Jessica Jakosalem

Hello All!
Thank you so much Renee, for asking me to be your guest blogger.
It was the last thing I expected, among other things, like
collaborating with me
to try a first time meditation and mandala workshop together for later
this November!
I started coloring mandalas as a hobby about 6 years ago, in 2007,
this November!
I started coloring mandalas as a hobby about 6 years ago, in 2007,
when my life was quite different than now.
I found several Susanne Fincher books at Barnes and Noble,
and fell into all types of mandalas: Mosaic pieces that reminded me of my
western Christianity and Roman Catholic churches I have attended for all my life. Their windows, made of stained glass, created a spiritual atmosphere.
The mandalas brought me right back to these memories and sacred spaces.
As I paged through the mandala books I admired the Native American “dream weaver” types of mandalas with the
whimsical alligator or feathers attached to the mandala designs..and often
recreated in wind chimes and housewarming ‘good luck’ wall hangings to protect the people and the space
from bad spirits.
I have colored 4 different types of mandalas, and after all these years,
I only showed Valerie Beck of Womens Innovative Network at a fashion boutique
and mentioned now to Renee Raville of Simple Life. Simple Health. upon
several weeks after meeting her at another women's support group called
In Her Shoes Foundation in Chicago this past September of 2013!
In Her Shoes Foundation in Chicago this past September of 2013!

Susanne Fincher ,with her Master of Arts, is a Jungian –oriented
psychotherapist whose books and mandalas, that I mentioned above, have helped me understand myself, relieve my stress, and
transition into being a better
person and deal with all that life brought my way – good and bad.
In 2007 , I lived in the Gold Coast of Chicago and was burnt out on the singles
party scene. I experienced tumultuous relationships that got nowhere
and engaged in a series of heartbreaks and changes.
Doing the mandalas created a sense of calm, refuge, and focus in my
life that nothing else could achieve (except maybe the Zumba classes that I love so much)!
On page six of book four in her series, Ms. Fincher states, “Creating mandalas provides a stabilizing anchor for individuals.”
Her Mandala photo #1 of a girl with long flowing hair is described by Fincher as,
"Being and doing in the world means that your words and actions flow from who you really are.”
I'm now at a point of full creativity with a formerly quiet but now higher state of confidence, energy and balance.
I'm now at a point of full creativity with a formerly quiet but now higher state of confidence, energy and balance.
It may help that I'm in a more committed, monogamous relationship since 2010.
Or perhaps the mandala making put me in a state where I could manifest what I wanted in a relationship.
The mandala making has helped me balance out my gemini personality and the various roles I play/have in my life such as
model, fashionista, PR director, girlfriend, and friend (amongst others).

I am still sensitive and very vulnerable to what other people think of me.
I now express myself and don't hold back so much thanks to the therapeutic affects
of the mandalas and the inner peace and confidence they have cultivated.
Now I am even creating my own designs!
I hope you will join Renee and I as we co-host a mandala/meditation workshop on the 24th of this month, November, 2013.
Feel free to contact her or myself for additional information on this workshop!
chiquijess@rocketmail.com!
I hope you will join Renee and I as we co-host a mandala/meditation workshop on the 24th of this month, November, 2013.
Feel free to contact her or myself for additional information on this workshop!
chiquijess@rocketmail.com!
Thursday, October 3, 2013
What is happening at Simple Life. Simple Health?
I am taking a few moments to post below a little email blast that I sent to everyone on my contact list so that anyone can see it, even if you are not currently on the list. I hope you would message me and ask to be signed up for the mailing list. In the near future you will be able to do this yourself when I send out the newsletter. For the time being just send me an email and I will add you myself. Thanks everyone!
Restorative Yoga and Aromatherapy
Cost: $30
Location: The Yoga Boutique 655 W. Irving Park Rd. Chicago, IL 60613
REGISTER: theyogaboutiquechicago.com
If you have any questions, please call Dana at 773-248-0685
or Renee at 312-869-0726
Ladies Night at Christopher Thomas Salon
**FREE Margaritas and Wine
Calling all the ladies! Come out for some complimentary drinks and mingle with other ladies. Receive discounts for hair and color services. There are also discounted facials and hand massages (provided by yours truly) so you can check out my new Peace and Calming oil blend.COME GET PAMPERED!
The Simple Life. Simple Health. website is being totally revamped. So stay tuned for that much awaited unveiling. Also, new classes and workshops are being scheduled and will be discussed in the next email update. I am creating a newsletter for you. I am also creating an Etsy account so you can order products and gift bags online. Yes you heard that correctly GIFT BAGS!! If you have not seen these cute little numbers then check out the pics on my Simple Life. Simple Health. Facebook page
While you are there "Like" the page and show your support!
Also, check out the Simple Life. Simple Health. blog and become a subscriber. There are some great posts about Microgreens, Aromatherapy, Canning, etc. I would love comments too so I know you are out there and don't feel all alone in blogger land!
If you know someone that would be interested in having me come in and teach some workshops please let me know. I do them on a variety of subjects and love collaborating with others.
If you know someone in need of bodywork let me know or give them my information and spread the love!
Hello friends of Simple Life. Simple Health.
I have some exciting fall updates to share with you! Let's begin...
Restorative Yoga and Aromatherapy
with Dana Robert and Renee Raville
Aromatherapy
is the use of essential oils to effect mental, physical, and spiritual
well-being. We will begin this workshop with a look at what essential
oils are, discuss and smell some common oils and learn about their
therapeutic qualities. Each participants will have a chance to use
essential oils while making their own bath salt to take home. This will
be followed by a one hour restorative yoga practice which will
incorporate the essential oils. This is one sense journey you wont want
to miss.
When: Friday,October 11th from 7:15-8:45pm
Location: The Yoga Boutique 655 W. Irving Park Rd. Chicago, IL 60613
REGISTER: theyogaboutiquechicago.com
If you have any questions, please call Dana at 773-248-0685
or Renee at 312-869-0726
Ladies Night at Christopher Thomas Salon
**FREE Margaritas and Wine
Calling all the ladies! Come out for some complimentary drinks and mingle with other ladies. Receive discounts for hair and color services. There are also discounted facials and hand massages (provided by yours truly) so you can check out my new Peace and Calming oil blend.COME GET PAMPERED!
When: Thursday October 17th 3-8p.m.
Cost: FREE (discounted services)
Location: 655 W. Irving Park Rd. Chicago, IL 60613
Call Christopher Thomas Salon at 773-929-0700
or Renee Raville/Simple Life. Simple Health. at 312-869-0726
Cost: FREE (discounted services)
Location: 655 W. Irving Park Rd. Chicago, IL 60613
Call Christopher Thomas Salon at 773-929-0700
or Renee Raville/Simple Life. Simple Health. at 312-869-0726
There are other workshops coming in November. I will send another email outlining these details further but for a sneak preview I will say this:
Wednesday November 6th I am doing a FREE workshop on Microgreens at Element Wellness 233 W. North Avenue. Light refreshments at 6pm and the workshop starts at 6:30pm. You will leave knowing why they are so good for you, sample some different kinds, and know how to grow them and/or where to purchase them if you would like some for your home (HINT: you buy them from me).
Friday November 22nd I am doing a Microgreens workshop at The Yoga Boutique at 655 W. Irving Park Rd. and serving FREE smoothies. You will learn how to grow microgreens, why they are healthy, get a free smoothie snack, and sample some microgreens. You will also know how to grow them on your own and where to purchase them for your home (HINT: you get them from me). Workshop cost: $15
Last but not least:Wednesday November 6th I am doing a FREE workshop on Microgreens at Element Wellness 233 W. North Avenue. Light refreshments at 6pm and the workshop starts at 6:30pm. You will leave knowing why they are so good for you, sample some different kinds, and know how to grow them and/or where to purchase them if you would like some for your home (HINT: you buy them from me).
Friday November 22nd I am doing a Microgreens workshop at The Yoga Boutique at 655 W. Irving Park Rd. and serving FREE smoothies. You will learn how to grow microgreens, why they are healthy, get a free smoothie snack, and sample some microgreens. You will also know how to grow them on your own and where to purchase them for your home (HINT: you get them from me). Workshop cost: $15
The Simple Life. Simple Health. website is being totally revamped. So stay tuned for that much awaited unveiling. Also, new classes and workshops are being scheduled and will be discussed in the next email update. I am creating a newsletter for you. I am also creating an Etsy account so you can order products and gift bags online. Yes you heard that correctly GIFT BAGS!! If you have not seen these cute little numbers then check out the pics on my Simple Life. Simple Health. Facebook page
While you are there "Like" the page and show your support!
Also, check out the Simple Life. Simple Health. blog and become a subscriber. There are some great posts about Microgreens, Aromatherapy, Canning, etc. I would love comments too so I know you are out there and don't feel all alone in blogger land!
If you know someone that would be interested in having me come in and teach some workshops please let me know. I do them on a variety of subjects and love collaborating with others.
If you know someone in need of bodywork let me know or give them my information and spread the love!
FALL SPECIALS:
- $40 Reiki & Aromatherapy
- $40 Holistic Consultation (includes foot scrub and aromatherapy)
- $10-$20 Wheatgrass and Microgreen Trays
- $10 tinctures for building immunity and other health concerns
- $5 Sinus clearing inhalers (all natural with essential oils)
- $10 Allergy clearing inhalers (all natural essential oils)
- Tonic cleanses (call for customized packages and pricing)
- Juice cleanses (call for customized packages and pricing)
- Free delivery for people in the Lakeview vicinity. Small fees may apply elsewhere.
- $13, $25, and $50 gift bags available. These can be customized upon request.
Monday, September 30, 2013
Growing Microgreens and Wheatgrass
Microgreens are very easy to grow indoors. I have some shelves on a wall that I place mine on. Usually within a week they are ready to eat. Some take a bit longer than others but generally they grow quickly and need minimal light. Wheatgrass is the same way. It doesn't need to be near a window and grows very quickly.
Here is the process: First you soak the larger seeds. I soak my buckwheat, sunflower, wheatgrass, and barley grass seeds. This softens the hull of the seed so it can sprout easier once on the soil. You don't have to do this but I have found that it takes longer to grow if you don't. For the smaller seeds such as Pak Choi, Radish, Arugula, and Mustard I don't bother soaking. The seeds are small and are sprouted within a day. Additionally, making the smaller seeds wet would also make it much for difficult to spread them evenly on the tray.

The seeds closest to the front are the buckwheat seeds. Some of them float and some of them sink. This doesn't matter. They are all okay to use in the trays.
 These are the sunflower seeds up close as they soak.
 These are the wheatgrass seeds as they soak.
After they have soaked for a day I go ahead and plant them. The directions I got when I first ordered the kit said to soak for 8-12 hours. Then it said to drain the water and let them sit for another 8-12 hours with a wet paper towel over them. Finally, it instructed you to plant them.
I have started letting them soak for 12-24 hours and then planting them. This has worked out fine for me so far.
I take a tray and add about 5 cups of dirt and spread it evenly throughout the tray. I have started getting the trays with and without drainage holes. I put the dirt in the one with the drainage holes and then place that one into the tray without holes. This enables me to catch the water and keeps the water from sitting in the tray too long and becoming moldy which can happen if you plant them in the tray without any holes.
I get my trays from the local Brew & Grow store and sometimes from local home improvement and garden shops.
 Above you can see the dirt spread in the tray. In this particular tray I partitioned off several sections because I want to grow several kinds of greens in the same tray. In this particular one I did Pak Choi, Arugula, Mustard, and Radish. With the smaller seeds I sow about two teaspoons of seeds for a WHOLE TRAY so for the partial tray I used about half a teaspoon of seeds since these seeds are so much smaller. When I use the larger seeds such as Wheatgrass, Buckwheat, Sunflower, or Barley Grass I use almost a whole cup of seeds in a tray.


Once the seeds are placed in the dirt I water it very well to get everything nice and moist since this is what helps the seeds sprout. This is important with all of your trays but especially the ones with the smaller seeds that you did not soak. It is the adding of the moisture that helps them break through their hulls and grow. If you don't keep them moist the growth process will be stopped or at the very least delayed.

 After two days this is what the Wheatgrass looks like (above) and the Sunflower greens (below)
 Two days later (four days in the tray) here is what the Wheatgrass and Sunflower greens look like, respectively:

 After six days the Wheatgrass can start to be cut and used (7 days total if you include the day to soak it)
 Below you can see the Sunflower greens after 6 days. The hulls remain atop the greens so you pick them off when you use them. It doesn't hurt if you eat a couple. These could start to be cultivated and eaten. I will probably wait another day.
 The microgreens have traditionally been used as garnishes in restaurants but are finally being recognized for the amazing nutritional value. I put them in my salads. I have used all microgreens to make my salads. They pack an amazing nutritional punch, are beautiful to grow, and taste amazing, not to mention they grow very quickly.
So now that you know how to grow them. Let's talk more about why you should grow them.
Microgreens pack more nutrients than mature leaves from the same plant. They usually have 4-6 times more nutrients but exact numbers vary due to where it is grown, when it is harvested, and the soil medium used. It usually takes 7 days of sunlight and soil before they are ready to be harvest but again this varies depending on the seed type, where it is grown, when it is harvest and the soil medium used.
In addition to the ones I mentioned growing above, such as Pak Choi, Arugula, Mustard, Radish, Sunflower, and Buckwheat some other common ones are Daikon Radish, Cilantro, and Basil. There are many additional kinds as well.
Microgreens are harvested during the cotyledon stage of development. This is when the first true leaves sprout. It is after the germination and sprouting stage but before the plant fully develops its root and leaf structures.
What is the difference between a sprout and a microgreen? When you consume sprouts you are consuming the root in addition to the little plant that is starting to grow. With microgreens you are not eating the root, you are only eating the stem and leaves.
Wheatgrass increases your red blood cell count. It lowers blood pressure. It cleanses blood, organs, and the gastrointestinal tract of debris. It stimulates our metabolism and our body's enzyme systems by enriching our blood. It aids in reducing blood pressure by dilating blood pathways throughout the body. Wheatgrass stimulates the thyroid gland, corrects obesity, indigestion, and a host of other complaints. It alkalizes the body which helps in treating a host of gastrointestinal issues. It is a powerful detoxifier and liver and blood protector. Enzymes and amino acids found in wheatgrass protect us from carcinogens like no other food or medicine. It strengthens our cells, detoxifes the liver, and bloodstream, and chemically neutralizes environmental pollutants. Wheatgrass fights tumors and neutralizes toxins. It generally cleanses the blood and neutralizes and digests toxins in our cells. It contains beneficial enzymes that help your body work - whether it is healing a cut or losing weight. Last but not least, it is remarkably similar to our blood. It slows aging, heals our skin, provides oral care, restores fertility, and promotes youthfulness.

Above is a picture of the composition of chlorophyll and our blood. The similarity in structure between the two is what has earned wheatgrass the name of "Green Blood". Additionally, our bodies thrive in an alkaline state. The hydrogen content is what determines alkalinity and its content in our blood is 7.4. Wheatgrass has the same hydrogen content/alkalinity of 7.4
I can't say enough about this amazing food. I can however encourage you to start out by drinking one ounce and then increasing weekly from there. You should start out small because it's such a powerful detoxifier that it can give you an upset stomach if you are not careful. I also encourage you to wait two hours after eating before you drink it. I also encourage you to wait to eat for at least thirty minutes once you drink it.
Recommendations for choosing seeds and soil:
Make sure your seeds are organic, have a high germination rate, and are microbially tested.
If you want suggestions of brands or companies to use you can email me. I don't want anyone to think I am being paid to advertise a certain brand. I write my blogs because I love natural health and nutrition. I also love showing others how to do these things for themselves and enjoy seeing people thrive and live to their highest potential.
For the soil, I use mushroom compost which is very cheap, doesn't have chemicals, and can be purchased from your local hardware and/or home improvement store. Be careful to not buy your run of the mill potting soil especially if it has fertilizers and stuff in there otherwise you will be ingesting those chemicals.
Please feel free to email me with any questions or to book a workshop where I can demonstrate and show you in person how to grow these amazing living foods.
reneeraville@simplelifesimplehealth.com
Here is the process: First you soak the larger seeds. I soak my buckwheat, sunflower, wheatgrass, and barley grass seeds. This softens the hull of the seed so it can sprout easier once on the soil. You don't have to do this but I have found that it takes longer to grow if you don't. For the smaller seeds such as Pak Choi, Radish, Arugula, and Mustard I don't bother soaking. The seeds are small and are sprouted within a day. Additionally, making the smaller seeds wet would also make it much for difficult to spread them evenly on the tray.

The seeds closest to the front are the buckwheat seeds. Some of them float and some of them sink. This doesn't matter. They are all okay to use in the trays.


After they have soaked for a day I go ahead and plant them. The directions I got when I first ordered the kit said to soak for 8-12 hours. Then it said to drain the water and let them sit for another 8-12 hours with a wet paper towel over them. Finally, it instructed you to plant them.
I have started letting them soak for 12-24 hours and then planting them. This has worked out fine for me so far.
I take a tray and add about 5 cups of dirt and spread it evenly throughout the tray. I have started getting the trays with and without drainage holes. I put the dirt in the one with the drainage holes and then place that one into the tray without holes. This enables me to catch the water and keeps the water from sitting in the tray too long and becoming moldy which can happen if you plant them in the tray without any holes.
I get my trays from the local Brew & Grow store and sometimes from local home improvement and garden shops.


Once the seeds are placed in the dirt I water it very well to get everything nice and moist since this is what helps the seeds sprout. This is important with all of your trays but especially the ones with the smaller seeds that you did not soak. It is the adding of the moisture that helps them break through their hulls and grow. If you don't keep them moist the growth process will be stopped or at the very least delayed.


So now that you know how to grow them. Let's talk more about why you should grow them.
Microgreens pack more nutrients than mature leaves from the same plant. They usually have 4-6 times more nutrients but exact numbers vary due to where it is grown, when it is harvested, and the soil medium used. It usually takes 7 days of sunlight and soil before they are ready to be harvest but again this varies depending on the seed type, where it is grown, when it is harvest and the soil medium used.
In addition to the ones I mentioned growing above, such as Pak Choi, Arugula, Mustard, Radish, Sunflower, and Buckwheat some other common ones are Daikon Radish, Cilantro, and Basil. There are many additional kinds as well.
Microgreens are harvested during the cotyledon stage of development. This is when the first true leaves sprout. It is after the germination and sprouting stage but before the plant fully develops its root and leaf structures.
What is the difference between a sprout and a microgreen? When you consume sprouts you are consuming the root in addition to the little plant that is starting to grow. With microgreens you are not eating the root, you are only eating the stem and leaves.
Wheatgrass increases your red blood cell count. It lowers blood pressure. It cleanses blood, organs, and the gastrointestinal tract of debris. It stimulates our metabolism and our body's enzyme systems by enriching our blood. It aids in reducing blood pressure by dilating blood pathways throughout the body. Wheatgrass stimulates the thyroid gland, corrects obesity, indigestion, and a host of other complaints. It alkalizes the body which helps in treating a host of gastrointestinal issues. It is a powerful detoxifier and liver and blood protector. Enzymes and amino acids found in wheatgrass protect us from carcinogens like no other food or medicine. It strengthens our cells, detoxifes the liver, and bloodstream, and chemically neutralizes environmental pollutants. Wheatgrass fights tumors and neutralizes toxins. It generally cleanses the blood and neutralizes and digests toxins in our cells. It contains beneficial enzymes that help your body work - whether it is healing a cut or losing weight. Last but not least, it is remarkably similar to our blood. It slows aging, heals our skin, provides oral care, restores fertility, and promotes youthfulness.
Above is a picture of the composition of chlorophyll and our blood. The similarity in structure between the two is what has earned wheatgrass the name of "Green Blood". Additionally, our bodies thrive in an alkaline state. The hydrogen content is what determines alkalinity and its content in our blood is 7.4. Wheatgrass has the same hydrogen content/alkalinity of 7.4
I can't say enough about this amazing food. I can however encourage you to start out by drinking one ounce and then increasing weekly from there. You should start out small because it's such a powerful detoxifier that it can give you an upset stomach if you are not careful. I also encourage you to wait two hours after eating before you drink it. I also encourage you to wait to eat for at least thirty minutes once you drink it.
Recommendations for choosing seeds and soil:
Make sure your seeds are organic, have a high germination rate, and are microbially tested.
If you want suggestions of brands or companies to use you can email me. I don't want anyone to think I am being paid to advertise a certain brand. I write my blogs because I love natural health and nutrition. I also love showing others how to do these things for themselves and enjoy seeing people thrive and live to their highest potential.
For the soil, I use mushroom compost which is very cheap, doesn't have chemicals, and can be purchased from your local hardware and/or home improvement store. Be careful to not buy your run of the mill potting soil especially if it has fertilizers and stuff in there otherwise you will be ingesting those chemicals.
Please feel free to email me with any questions or to book a workshop where I can demonstrate and show you in person how to grow these amazing living foods.
reneeraville@simplelifesimplehealth.com
Thursday, September 26, 2013
Popular Essential Oil Blends
Here are some essential oil blends that many people enjoy:
Calming: 10 drops of Lavender, 3 drops of Chamomile, 3 drops of Sandalwood, and 8 ounces of carrier oil. I make my oil blends stronger and would tend to use less carrier oil than this personally. I suggest starting out by adding an ounce of carrier oil and testing your skin to see if you have a reaction. If you like the intensity and it does not aggravate your skin then make the strength to your liking. This applies for the rest of the recipes as well.
 Energizing: 8 drops of Peppermint, 4 drops of Lemon or Orange, and your carrier oil to preference.
 Anti-bacterial and anti-viral blend: 5 drops of Tea Tree Oil, 5 drops of Oregano, and 5 drops of Peppermint or Rosemary and carrier oil to preference.
 For children under 12 years old and infants only use one oil at a time. Don't blend essential oils. Also, you use a far less quantity of essential oil. For example, for a fever you would only put 1-2 drops of Lavender oil in 32 ounces of water and make a compress for the forehead. If a child or infant is irritable due to fatigue put 1 drop of Lavender in 1 Tbsp. of oil and massage into back and neck.
 Bug repellant: Lemon and Eucalyptus repel mosquitoes and ticks. It lasts for 4-5 hours. It is an excellent alternative to DEET since DEET has neurological side effects.
These are just a few recipes for now. More to come in the future! Happy oil blending, healing, and health.

Calming: 10 drops of Lavender, 3 drops of Chamomile, 3 drops of Sandalwood, and 8 ounces of carrier oil. I make my oil blends stronger and would tend to use less carrier oil than this personally. I suggest starting out by adding an ounce of carrier oil and testing your skin to see if you have a reaction. If you like the intensity and it does not aggravate your skin then make the strength to your liking. This applies for the rest of the recipes as well.
These are just a few recipes for now. More to come in the future! Happy oil blending, healing, and health.
Subscribe to:
Posts (Atom)